Unreal Engine event dispatchers are one of three main ways that you can communicate between blueprints. For anyone familiar with observers or publishers & subscribers, it’s the same concept. For anyone else, event dispatchers are essentially a call and response setup. Imagine a medieval town. A lookout keeps it’s eye out for trouble. One day, they spot it and call out an alarm. Inside the city, guards muster towards the gates, townsfolk retreat to safe havens. Outside, the brigands that came near, triggering the guard’s call, hear that call and retreat to the edge of the forest having lost the element of surprise.
In this example, the lookout is the Publisher. The part of the event dispatcher that performs the call. The others – guards, townsfolk, brigands – they’re all observers or subscribers. They have pre-planned responses to hearing that call. Their actions differ, but it’s all triggered by the lookout’s call.
An important note for this as well – the Lookout doesn’t have any knowledge of the people reacting to them, but the guards, townsfolk, and brigands are aware and ready to respond to the Lookout. Likewise in blueprints, the publisher doesn’t know about the subscribers. This creates loosely coupled code, which is a cleaner design pattern than making direct references between two blueprints all the time. Following this pattern, you can avoid issues that may arise by having connections between blueprints – either that make code messier and harder to manage, or wind up causing errors by having things referenced in memory that don’t need to be which can potentially lead to memory issues.
Lets look at how to set up Unreal Engine event dispatchers in an example.
Toggling Lights with Event Dispatchers
This section uses an Interface to help with object interaction. Interfaces are another way to communicate with blueprints. So, we’ll need to set up the interface and keybinds. You can skip this if you instead set up the button in the next section to be triggered on On Overlap with a box collision.
Create and set up an interact interface (optional)
This sets up a blueprint interface to facilitate the interaction part of the button press in the next section, then connects it to a keybind.
- Create the interface. Create a new Blueprint Interface by right clicking the content drawer Blueprints -> Blueprint Interface. Name it
BPI_InteractInterface. - Set up the interface. Add an On Interact function. Save and compile.
- Set up the keybind for interacting. In your player controller, right click the event graph and select an input (ie, E key).
- Connect that to a
Line Trace by Channelnode.- Start Input: Create a node for your camera, in my case it was First Person Camera. From that node, drag and create a
Get World Locationnode. Drag that node to the Start input ofLine Trace By Channel. - End Input: From the First Person Camera node, drag out again and create a
Get Forward Vectornode. From this node, drag out and create aMultiplynode. For the second input into Multiply, create aMake Literal Floatnode and connect. Drag the output fromMultiplyand create anAddnode. Use theGet World Locationnode as a second input to the add. Finally, connectAddto theEndinput onLine Trace By Channelnode.
- Start Input: Create a node for your camera, in my case it was First Person Camera. From that node, drag and create a
- Drag from
Line Trace By Channeland create aBranchnode.- From the
Line Trace By Channelnode, drag from the return value to the red condition input of theBranchnode.
- From the
- From the True connection of the
Branch node, drag and create an On Interact node fromBPI_InteractInterface.- From
Line Trace By Channelsdrag from theOut hitpin and create aBreak Hit Resultnode. Expand theBreak Hit Resultnode and drag theHit Actorto the Target ofOn Interact.
- From

Set up the button
- Create a new Blueprint Actor named
BP_Button. - Under components on the left, click Add and add a static mesh or shape. For example purposes, I just selected
Cube. - Create a new Event Dispatcher. In the bottom left of the default layout, there’s an
Event Dispatcherssection. Create a new event dispatcher and call itOnButtonPress.

Connect the interact interface (only necessary if you set up the interface in earlier steps)
- In
BP_Button, go to the top middle and click on the Class Settings button. In the Details Panel to the right, go to interfaces and addBPI_InteractInterface.

Set up the light
- Create a new blueprint actor and name it
BP_Light. - Under Components, add a new Point Light.
- In the event graph, drag from
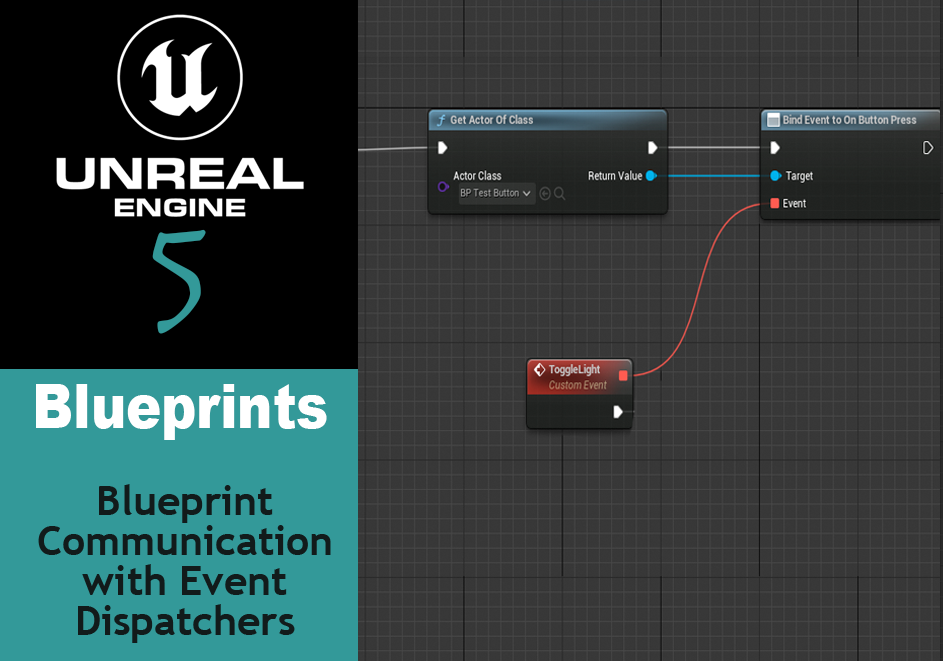
Event Begin Playand create aGet Actor of Classnode. In the Actor Class dropdown, find and select theBP_Buttonblueprint. - From
Get Actor of Classnode, drag the connection and create a newBind On Button Press. Make sure the Return Value of the Get Actor nod connects to the Target of the Bind event node.- Alternatively, you can search for
Assign On Button Press. This will create both a Bind Event node and a Custom Event node.
- Alternatively, you can search for
- Drag from Bind Event node’s Event pin and create a new custom event. Name this custom event “Toggle Light”.
- Drag from ToggleLight’s connection pin and create a
Flip flopnode. Drag the Point Light component from under variables onto the event graph.- From the point light node, drag and create a
Set intensitynode. Set the intensity to 10,000 or higher. In theFlip Flopnode, drag a connection from A to theSet Intensitynode. - Copy the
Set IntensityandPoint Lightnodes and paste below. Connect the newSet Intensitynode to theBconnection of theFlip Flopnode. Set that intensity to 0.0.
- From the point light node, drag and create a

Add the components to the level
- Drag BP_Light and BP_Button into the level editor and place somewhere you can see them easily.
- Save and compile everything, then run. You should now be able to interact with the button to toggle the light on and off.
Other Resources
For further examples and alternate explanations, check out the following:
- Youtube
- Tyler Serino – Event Dispatchers | Unreal 5 Tutorial
- Ali Elozheiry – The Most Common Mistake Beginners make in Unreal Engine
- Matt Aspland – Event Dispatcher – The Basics of Nodes in Unreal Engine
- Unreal Engine – Blueprint Communications | Live Training | Unreal Engine (Timestamp)
- Unreal Engine’s Event Dispatchers and Delegates Quick Start Guide (for version 5.3)
One Reply to “Learning Unreal 5: How to Communicate using Event Dispatchers”
Comments are closed.