
Swift Snapshot Testing is a wonderful open source library that provides support for snapshot tests in your swift code. Its snapshot comparison options are robust, supporting UIImages, JSON, ViewControllers, and more. Originally developed with unit tests in mind, this tool is easily extended to support comparison of XCUIElements in UI tests as well, allowing for quick creation of automated tests that perform more robust visual validation than XCUI can provide out of the box.
Installing Swift Snapshot Testing
Installing involves two steps – importing the package and updating the dependency manager in your project to use the specified version.
Importing the Package (Xcode 13)
- Go to File -> Add Packages
- Click the plus and copy the Package Repository URL from the Snapshot Testing Installation Guide
- Load the package
- Select Dependency Rule and add to the project where the UI test targets live.
If the tests live in the same scheme as the application code, you’ll have to update the project settings as well. Even if they live in a different scheme, follow the steps below to ensure that the package is associated with the correct target.
Set the Package to the Correct Target
- Go to Project Settings
- Select Project and ensure that the SnapshotTesting package is displayed
- Select the Application Target and ensure that the SnapshotTesting package is not displayed under Link Binary with Libraries
Caption: Example: You don’t want the package to be associated with the application target, in this case SnapshotTestingExample

- Select the UI Test target and ensure the package is displayed under Link Binary with Libraries
Caption: Example: You do want the package associated with the UI test target in Project Settings, in this case SnapshotTestingExampleUITests

Using Swift Snapshot Testing
Working with snapshot testing is as simple as writing a typical test, storing an image then asserting on that image. You’ll have to run the test twice – the first “fails” but records the reference snapshot, then the second actually validates the snapshot taken during the run matches that reference.
Writing a Snapshot Test
In the case of UI testing, without any custom extensions, you can assert on UIImages either on the screen as a whole, or on a specific element.
Snapshot the whole screen
// Using UIImage for comparing screenshots of the simulator screen view.

let app = XCUIApplication()

// Whole screen as displayed on the simulator

let snapshotScreen = app.windows.firstMatch.screenshot().image

assertSnapshot(matching: snapshotScreen, as: .image())
Tip – Set the simulator to a default time when using whole screen snapshots
A full screen snapshot includes the clock time, which can understandably cause issues. There is a simple script you can add to the pre-run scripts for tests in the project scheme that will force a simulator to a set time to work around this.
To Set a Default Time
- Select the Scheme where the UI tests live
- Go to Product -> Scheme -> Edit Scheme
- Expand Test, and select Pre-Actions
- Hit the + at the bottom to add a new script and copy the script below
xcrun simctl --set testing status_bar booted override --time "9:41"

Snapshot a specific element
// Using UIImage for comparing screenshots of XCUI Elements

// Specific element on the simulator screen

let snapshotElement = app.staticTexts[“article-blurb”].screenshot().image

assertSnapshot(matching: snapshotElement, as: .image(precision: 0.98, scale: nil))
If you instead utilize the custom extension that provides support for XCUIElements directly, as found in this pull request on the repo, the code is simplified a bit and removes the need to create a screenshot manually, as seen below.
// Using extension to support direct XCUIElement Snapshot comparison

let app = XCUIApplication()

// Whole screen as displayed on the simulator

let snapshotScreen = app.windows.firstMatch

assertSnapshot(matching: snapshotScreen, as: .image())

// Specific element on the simulator screen

let snapshotElement = app.staticTexts[“article-blurb”]

assertSnapshot(matching: snapshotElement, as: .image(precision: 0.98, scale: nil))
Precision and Tolerance
One of the features I appreciate in this framework is the ability to set a precision or tolerance for the snapshot tests. As seen in some of the above examples, the precision is passed in on the `assertSnapshot()` call.
// Precision example

assertSnapshot(matching: snapshotElement, as:. image(precision: 0.98, scale: nil))
Precision is an optional value that can be set between 0-1. It defaults to 1, which requires the snapshots to be a 100% match. With the above example the two can be a 98% match and still pass.
Tip – Image size matters
While it makes sense when you think about it, it may not be readily apparent that you need to have two images of the same height and width. If they differ in overall size, the assertion will fail immediately without doing the pixel by pixel comparison.
Tip – Device & machine matters
Snapshots need to be taken on the same device, os, scale and gamut as the one it will be run against. Different devices/os may have differences in color, and my team even saw issues where the same simulator, os, and xcode version had snapshots of a slightly different size when generated on two different developer machines of same make and model – but were different years and slightly different screen sizes.
Reference Snapshots
As mentioned, reference snapshots are recorded on the first run of the test. On subsequent runs, the reference snapshot will be used to compare against new runs. If the elements change, it is easy to update them.
Snapshot Reference Storage Location
The snapshot references are stored in a hidden `__Snapshots__` folder that lives in the same folder in which the snapshot assertion was called.
For example, if my file directory looks like this:

If the functions that call `assertSnapshot` live in the `BaseTest.swift` file, the `__Snapshots__` folder will also exist under `Tests`. The snapshots themselves are then sorted into folders based on the class that called them.

Caption: Example: Finder view of the folder structure showing a full screen snapshot taken from a test found in the BaseTest class.
The snapshots will be named according to a pattern, depending on if they are full screen or specific element snapshots:
- Specific Element: <functionCallingAssertion>._<snapshotted element>.png
- Full Screen: <functionCallingAssertion>.<#>.png
// Take snapshot of specific element

func snapshotElement() {

let homeScreenLoginField = app.textFields[“login-field”]

assertSnapshot(matching: homeScreenLoginField, as: .image())

}

// Take snapshot of whole screen

Func snapshotScreen() {

let screenView = app.windows.firstMatch

assertSnapshot(matching: screenView, as: .image())

}
Given the examples above, the file names resulting of each would be:
- Specific Element: snapshotElement._homeScreenLoginField.png
- Whole Screen: snapshotScreen.1.png
Update Snapshots
There are two ways to update snapshots with this tool – with a global flag or a parameterized flag.
// Pass in update parameter

assertSnapshot(matching: someXCUIElement, as: .image, record: true)

// global

isRecording = true

assertSnapshot(matching: someXCUIElement, as: .image)
For the project where we implemented snapshot testing, we utilized the global flag to allow for snapshots to be generated in CI; otherwise, we used the parameterized variant for updating specific test/device combinations.
Tip – Tests With Multiple Assertions
Consider carefully if you are thinking about having multiple snapshot assertions in a single test. This is not something I would recommend, but largely based on the difficulty of updating the reference snapshots.
One hiccup we ran into with using snapshots was attempting to update them when a test had multiple `assertSnapshot()` calls. If you use the parameterized flag, the test will always stop at the first assertion where that flag is active to make the recording. Then you have to toggle it off, run it again for the next one and so on.
This behaviour is worse if you use the global flag, as once it hits the first assertion it will stop the test to take the screenshot, and never continue to the other assertions.
Snapshots on multiple devices
With this framework, you can simulate multiple device types on a single simulator by default. However if you find the need to run a full suite of tests on multiple simulators, you’ll need to extend the code to provide a way to do that – otherwise any simulator aside from the one that the reference shots were taken on will fail.
Resolving this on our team was actually pretty easy – my teammate Josh Haines simply overloaded the `assertSnapshot()` call to pass in the device and OS versions to the end of the file name so that it always checks the snapshot associated with a specific device.
/// Overload of the `assertSnapshot` function included in `SnapshotTesting` library.

/// This will append the device name and OS version to the end of the generated images.
func assertSnapshot<Value, Format>(

  matching value: @autoclosure () throws -> Value,

  as snapshotting: Snapshotting<Value, Format>,

  named name: String? = nil,

  record recording: Bool = false,

  timeout: TimeInterval = 5,

  file: StaticString = #file,

  testName: String = #function,

  line: UInt = #line

  ) {

  // Name will either be "{name}-{deviceName}" or "{deviceName}" if name is nil.

  let device = UIDevice.current

  let deviceName = [device.name, device.systemName, device.systemVersion].joined(separator: " ")

  let name = name

    .map { $0 + "-\(deviceName)" }

    ?? "\(deviceName)"

  SnapshotTesting.assertSnapshot(

    matching: try value(),

    as: snapshotting,

    named: name,

    record: recording,

    timeout: timeout,

    file: file,

    testName: testName,

    line: line

  )

}
The end results of this is an updated file name based on the simulator it’s taken on: <functionCalling>._<snapshotElement>-<device name>-<OS version>.png
For example, something like `testSnapshotTesting._snapshotElement-iPad-Pro-12-9-inch-5th-generation-iOS-15-5.png`
Triaging Failures
When a snapshot test fails, three snapshots are generated: reference, failure, and difference. Difference shows the reference and failure shots layered over the top of each other highlighting the areas where pixels differ. In order to see these snapshots, you need to dig into the Test Report and look at the entry right before the test failure message.
Viewing Snapshot Failures
- In a local run, right click on the test that has failed and select `jump to report`. In a CI run, download and open the .xcresult file in Xcode.
- Expand the test to see the execution details
- Expand the “Attached Failure Diff” section (found right before the failure)
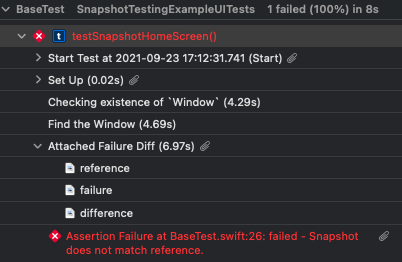
Caption: Example: Where to find the snapshots to triage for failures
When looking at the `difference` image, you’ll see the overlay of reference over failure to show where discrepancies are. It can be difficult to parse, but if you look at the example below, the white parts are roughly where the pixels differ while the matches are dark.

Caption: Example: The difference image showing the diff of the simulator clock
Check Swift Snapshot Testing’s GitHub repo, or get a tour of it from it’s creators in some unit tests at their website, pointfree.co.