Most people that have played PC games for any length of time are familiar with console commands – especially if you’ve played games like Bethesda’s Elder Scrolls games. For the unawares, typically, when in game you hit the tilde (~) key to bring up an input window that lets you type. Here you can type various commands – some engine specific, some game specific. Often times, these are used to help in development and testing to change values on the fly, trigger certain quests without doing them normally, make your character invulnerable – and more.
So, to help with the development of my game I wanted to see how custom console commands are set up in Unreal 5 using Blueprints.
Caveats
- Level Blueprints Only. When working with blueprints, you can only create custom console commands in the level blueprint. If you want to create console commands in other locations, you’ll need to dive into C++. Mike Stevanovic has a good video for the basics on youtube.
- Development Builds Only. Custom console commands only work in development builds – if you package your project for shipping, the commands won’t work there. If you want to implement cheats, you’ll need to implement them differently than discussed here.
Creating Custom Console Commands
Go to your level blueprint
- Open the level
- Click on the flow chart icon under the menu
- Click open level blueprint

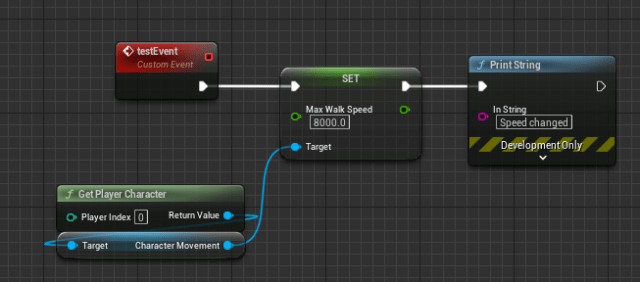
Create a custom event
For example’s sake, we’ll go ahead and create a custom event that will let us update the walking speed of the player.
- Right click in the event graph and search for the
custom eventnode - Name the custom event
testEvent - Right click on the event graph and create a
Get Player Characternode - Drag from the
Get Player Nodepin and create aCharacter Movementnode. - Drag from
Character Movementnode and create aSet Max Walking Speednode. Set the max speed to something very high, like 1000 (default is 600). - Connect the
Max Walking Speedto theCustom Eventnode. - Drag from the
Max Walking Speednode and create aPrint Stringnode. Update the text to “speed updated”. - Save and compile the blueprint.
(Optional) Make the walk speed variable customizable
- Click on the
testEventnode - In the details panel, click + next to input and add a variable named
Speedwith type ofFloat. - Connect the new
Speedpin to the input of theSet Max Walking speednode.

Using the console command
- Hit play on the engine to play the game.
- Once launched, hit tilde (~) to open the console window
- Type
ce testEventorce testEvent 1000if you set up the variable and hit enter. The string “speed updated” should appear in the top left corner and when you move around the character max speed should be much higher.
